Virtual Yosemite is an online interactive VR tour of Yosemite National Park and its surrounding areas in northern California.
It is best experienced on a large screen such as a desktop computer monitor or high resolution television. While the tour can be experienced on most smart phone and tablet screens, the relatively small sizes of these screens detract from the overall immersive experience. We, therefore, do not recommend viewing Virtual Yosemite on such small devices.
Currently, we are not offering the tour content for head-mounted VR systems due to their generally inferior visual displays, as well as health concerns regarding their extended use. However, as these technologies improve, we will continue to evaluate presentation of Virtual Yosemite with them.
All of Virtual Yosemite’s interactive panoramas are photographed and presented in high resolution, which allows users to zoom in to view any portion of any scene in considerable detail.
Most tour controls and features can be accessed via buttons on the green Control bar at the bottom of the tour screen.
 Each panorama includes environmental audio tracks to enhance the user experience, so adjust your volume settings accordingly. The sound can also be turned on or off by clicking on the Sound button.
The Virtual Yosemite tour will randomly switch to another panorama every two minutes if no user activity is detected. Many users take advantage of this feature to provide a slideshow type of experience, and enjoy the ambient sounds in the background.
 Virtual Yosemite is best viewed using Chrome or Safari browsers on computers, as well as Android and iOS mobile browsers. For the best user experience on a computer, click the Fullscreen button on the control bar. To return to normal viewing in your browser, click the Fullscreen button again. Pressing the ESC key on your keyboard will also return you to normal viewing.
 The Control button is used to reverse the panning and tilting directions when you click and drag within a panorama. The default directions are different depending on whether you’re using a mouse while viewing on a computer screen, or finger swipes while on a tablet. Some users prefer a different pan and tilt response. This button simply toggles between the directions the image moves under your inputs. If the default directions don’t feel quite right to you, simply click this button to change them.

Looking around within a panorama can be done by clicking and dragging your mouse. The panoramas will also slowly autorotate after a few seconds of inactivity. Autorotation can be turned off and on by clicking the Auto Rotate button.
The Virtual Yosemite tour will randomly switch to another panorama every two minutes if no user activity is detected. Each panorama will rotate through most of its 360° view within that two minutes. If you want to prevent the panoramas from changing every two minutes, or to keep the view of the current panorama from changing, simply turn off the Auto Rotate feature using this button.
Zooming in or out is accomplished with use of the + and – Zoom buttons, or via the scroll wheel on certain computer mice. Zooming is also done on mobile devices via finger pinches on the screen.
 If you’re viewing the tour on a mobile device, you can click on the Gyro control button to enable panning and tilting of your view simply by moving your device in the direction(s) you want to look. Clicking the Gyro control button again returns you to normal viewing, where you can use finger swipes to change view direction. Use finger pinches to zoom in or out. (Note that on iOS 12.2 or later, you’ll have to authorize the Gyro control by going into Settings –> Safari –> Privacy & Security, and turn on: Motion & Orientation Access.)
 Navigating from location to location within the tour is most easily done by clicking on any of the red Target hotspots visible in any panorama. Doing so will take you to that nearby location. Hovering your mouse over any of these targets will show a brief popup description and thumbnail view of where it leads.
 You can also navigate by using the Map button on the lower right corner of the screen. Activating the map will bring up a Google terrain map of the area showing your current position (along with a “radar beam” showing the direction you’re looking), as well as other nearby viewing locations
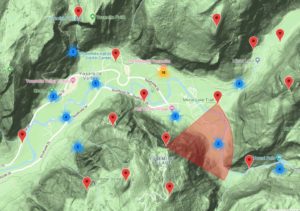 The 350+ panorama locations, known as “nodes,” are marked with a standard Google pin. As you zoom in and out on the map, the pins will change so that some include numbers on them. These numbers represent the presence of multiple nodes (panoramic views) within that area. Clicking on a numbered pin will zoom the map in to show the individual nodes available, and clicking on an individual pin will take you to that location. Close the Map to view the new location interactively.
 A geographic Index of the tour panoramas (organized alphabetically by location names in each region) is also available by clicking on the Panorama Index button on the lower left of the screen.
Be sure to scroll downward through this Index to see links to the different regions of the park and its surrounding areas.
 Every tour panorama also contains detailed caption information about the location and subjects being presented. Click on the Captions button to see these. If the location you’re looking at is reached via one of Yosemite’s many trails, a link to the wonderful trail descriptions offered by yosemitehikes.com is provided within the caption. You will also find links to Yosemite Collection photographs shot from these locations (or nearby), which you can purchase in a variety of formats.
 Some users like to see our interactive panoramas of these wonderful Yosemite locations unobstructed by our navigation tools and node links. You can do this for a single panorama by clicking on the Show / Hide Links button on the lower right portion of the tour window. Click the button again to return to normal tour viewing and navigation.
Thank you for joining us, and enjoy your visits (both virtual and real) to Yosemite!